crockpot chili – Texas-ish

i recently read an article on Texas style chili, and the components that make it Texas-style. with a chili recipe of my own already hammered out, i wanted to combine the two to see what delightful concoction might emerge from my slow cooker. those actually from Texas, or with strong feelings about Texas chili might want to stop reading now. i’m positive i’ll offend you.

IMG_0400

i like a lot of produce in my chili, which seems to be against Texas chili rules, but that’s how i make chili. i started by chopping up onion, green pepper, a serrano pepper, chipotle peppers in adobo and a little leftover red pepper (optional) i had in the fridge.

IMG_0402

after all the veggies were cut and added to the crockpot, i opened all my canned ingredients and tossed them in: fire-roasted diced tomatoes, a can of tomatoes with green chilis, small cans of tomato sauce and tomato paste, and a can of black beans which had been drained and rinsed. seasonings were added on top of that: chili powder, cumin, coriander, worcestershire, molasses and a little honey. i like to think the addition of chipotles in adobo, worcestershire, molasses and honey provide a depth of flavor you wouldn’t get in chili otherwise.

IMG_0403

one of the main differences between Texas style chili and others is the meat. instead of your traditional ground meats, this chili uses stew meat – or chuck roast. i love fall-apart tender chuck roast that’s been in a crockpot. my grocery store sells stew meat, already cut, which i confirmed with the butcher was a combination of chuck roast and the next leanest cut. the benefit to purchasing it this way is the ability to buy smaller amounts (at least at my grocery store), and i find that much of the large pieces of fat have already been trimmed away, so the weight you’re purchasing is more usable meat. i cut the stew meat into smaller sized pieces and tossed them in. (don’t you LOVE crockpot “cooking?”)

IMG_0406

once everything was in the crockpot, i gave it a good stir to make sure that everything had appropriately co-mingled.

IMG_0407

and 8 hours later:

IMG_0408

chili!

next time i make this i might cut out the can of tomato sauce – it ended up a little soupy, but, in keeping with my family’s (Wisconsin) way of eating chili, it was over some noodles (!) so the soupy-ness was ok. (i can just feel the Texas chili gods rolling over at the mere mention of chili being served with noodles.)

IMG_0409


Crockpot Chili – Texas-ish

Serves approximately 3-4.

Ingredients:

1/2 onion, chopped

1/2 green pepper, chopped

1 serrano pepper, chopped

1 tablespoon chopped or minced garlic

2 chipotle peppers in adobo

1 teaspoon of adobo sauce from can of chipotles

1 – 14.5 oz can of fire-roasted diced tomatoes

1 – 10 oz can of tomatoes and green chilis (think Ro-Tel)

1 – 8 oz can of tomato sauce

1 – 15 oz can of black beans, drained and rinsed

3 teaspoons chili powder (use GOOD chili powder. mine is from Penzeys)

1 teaspoon cumin

1 teaspoon coriander

2 teaspoons worchestershire

1 teaspoon molasses

1 teaspoon honey

1.25 – 2 lb stew meat or chuck roast, cut into bite sized pieces

noodles, cooked as directed on package (optional)

garnishes: cheese, sour cream, chopped chives (optional)

Directions:

Add all ingredients, except noodles and garnishes, to crockpot. Cook on low for 8 hours, or high for 4 hours. Serve over noodles and garnish with cheese and sour cream. Sprinkle chopped chives on top.


fellow food and dining lovers: share your positive experiences of local businesses on @HeyLetsApp! download it free: http://hey.li/1E07nJX

chive and goat cheese frittata – good housekeeping cookbook recipe 3

cheap and easy.

i’m talking about eggs, people. i was looking for an inexpensive and easy recipe from my Good Housekeeping Cookbook that was healthy and packed with protein to make over the weekend. enter: chive and goat cheese frittata. i took some liberties with the ingredients since my boyfriend isn’t too excited about tomatoes. i replaced the tomatoes with sautéed red peppers, garlic and onions which added a step or two, but since i was roasting some rosemary potatoes, i had the time.

IMG_0391

sidenote: if you’re in the Milwaukee area, Glorioso’s is my favorite place for chopped garlic. it’s packed in oil and has a little vinegar and salt added that gives it a little something special. also, their 3 for $10 wine is pretty fantastic.

i started by chopping the red pepper and onions, and got that going in the pan with a little olive oil and salt and pepper.

IMG_0392

once that was cooked the majority of the way through, i added in the garlic. i always wait to add garlic since it burns pretty easily, and burnt garlic is sad, bitter garlic. meanwhile, i cracked the eggs into a large mixing bowl (i have yet to master a clean egg break.) i added the chopped chives and salt and pepper. once the peppers, onion and garlic were done cooking, i added them to the egg mixture.

i wiped out the cast iron pan and added the butter over medium heat and let it melt completely. the egg mixture was then added to the pan, with dollops of (delicious and creamy) goat cheese placed gently on top, and cooked for a few minutes until the edges set.

IMG_0393

i then popped the whole pan in the pre-heated 375 degree oven, and 10 minutes later, we had dinner. i served this with some roasted potatoes – they were peeled, chopped and dried on a paper towel (i’ve read it helps with crisping, which seemed totally true), then coated in olive oil, salt, pepper, garlic powder and fresh chopped rosemary. i baked them in the same 375 degree oven for about 40-45 minutes. i also threw together a salad with spring greens, and a homemade balsamic vinaigrette.

the frittata was obviously more than my boyfriend and i could eat, but it has re-heated beautifully for this week’s breakfasts. i thought this recipe was fantastic since it was so open to interpretation. you can really add whatever you’d like to this recipe and it would work out fantastic. i would love to try making one with mushroom, fontina (or gruyere) and sage, or use the flavored goat cheeses they have at the grocery store.


Chive and Goat Cheese Frittata (from Good Housekeeping Cookbook)

Ingredients

  • 8 large eggs
  • 1/2 cup(s) milk
  • 1/2 teaspoon(s) salt
  • 1/8 teaspoon(s) coarsely ground black pepper
  • 1 medium tomato, diced
  • 2 tablespoon(s) chopped fresh chives
  • 2 teaspoon(s) margarine or butter
  • 1/2 package(s) (5 1/4-ounce package) goat cheese, or 3 ounces shredded Fontina cheese

Directions

  1. Preheat oven to 375 degrees F. In medium bowl, with wire whisk or fork, mix eggs, milk, salt, and pepper. Stir in diced tomato and chopped chives.
  2. In nonstick 10-inch skillet with oven-safe handle (or wrap handle with heavy-duty foil), melt margarine or butter over medium heat. Pour in egg mixture; drop spoonfuls of goat cheese on top of egg mixture. Cook 3 to 4 minutes until frittata begins to set around the edge.
  3. Place skillet in oven. Bake 9 to 10 minutes or until frittata begins to set and knife inserted in center comes out clean.

fellow food and dining lovers: share your positive experiences of local businesses on @HeyLetsApp! download it free: http://hey.li/1E07nJX

review: The Pasta Tree

i’m a sucker for Valentine’s Day. call it a Hallmark holiday, or Single’s Awareness Day, or whatever you’d like, but i love my boyfriend, and few things are better than celebrating that and being around a bunch of other couples celebrating their love and their relationships as well. i should note that i do think Sweetest Day is dumb, though.

we decided to celebrate our love over large bowls of pasta at The Pasta Tree this year. The Pasta Tree been voted one of Milwaukee’s most romantic restaurants and best Italian, so it’s a natural choice for Valentine’s Day. our reservations were at 8:30, so we had drinks and appetizers at Thief Wine Bar beforehand. since parking around The Pasta Tree sucks, and it was cold, my man dropped me off at the door to find a spot. when i walked in, the fireplace was roaring and the hostess was smiling and ready to greet me. we were a little early for our reservation, so i sat at the bar and ordered some wine while i waited for my date to find parking.

the restaurant, while decorated gorgeously on a normal day, also had a little Valentine’s flair with some balloons. it’s exactly as you’d expect from an Italian restaurant, darker lighting and ornately decorated.

photo credit: pastatreemilwaukee.com

photo credit: pastatreemilwaukee.com

my boyfriend found some questionable parking spot and finally made it to the restaurant and our table was ready right at 8:30 as reserved. i love it when you make a reservation for a particular time, and the table is actually ready at that time. to me, that’s a sign of an organized, well-run restaurant.

before i continue with my glowing review, here are the two little things that i didn’t care for: we were seated in the old side of the dining room, which requires you to walk through a small portion of the kitchen; a). there was something on that small tiled portion of the floor there that could’ve sent me sailing in my nearly 3″ heels. i’m not sure if it was just a little greasy, or what, but ladies, you know what i’m talking about – that feeling that if you put too much weight on your heel, it’ll slide right out from under you, and you’ll end up making some unfortunate scene in front of an entire dining room and kitchen full of people. b). i understand that it’s Valentine’s Day, and if you can get one more table squeezed in there, that’s more money in your pocket, but i get really frustrated when restaurants attempt to squeeze in that table to where it compromises the comfort of the diners. i had the same problem at Cafe Corazon.

we walked through the newer dining area to get to this other dining area – the new area has lovely seating next to a fireplace, or in a window alcove, or even in normal tables that are spaced normally, but we were crammed into this area with one of us on a couch and the other seated in a small spot between the tables – so if he backed up, he’d hit the table. if i sat there, my hair would be over our neighbor’s table, etc. the couch was a little sunken, so i felt slouchy and short next to my date, and i felt like our knees were in each other’s personal space under the table, and not in a flirty way, more like a cramped not-enough-room way.

so space constraints and potential face-plant complaints aside, on to the food – i ordered the carbonara with spinach noodles. my dinner was spectacular. everyone knows that when there’s bacon present in food, there better be a lot of it, and it better be good…and this was creamy, light and full of bacon. exactly what i wanted out of my carbonara. i felt like the noodles were cooked perfectly as well for it being a busy night. but i suppose if your restaurant is called The Pasta Tree, the pasta better be superior.

there was also some bread provided before the meal that i thought was a little something special too. i think it had roasted cloves of garlic in it, and i’m thinking there was also some walnuts in it. my date had the Shrimp Broccoli Cream pasta, and the bite i had was delicious, although i had just been eating delightful chunks of bacon so it seemed a little lack luster in comparison. i would’ve expected a lemony or garlicky sauce, but it seemed a little bland…again, i was just eating bacon, so i have a feeling most things would be a little bland. the shrimp on his dish were large, and there was a good amount of shrimp for the dish. and simply an observation about the Shrimp Broccoli Cream dish, was that it arrived with a rather large stalk of broccoli on it which required a knife and fork to break it down. my preference would be to have that already in bite size pieces so i wouldn’t have to deal with it. i’m not sure if my date cared, but i wouldn’t want to deal with this gigantic tree of broccoli on my plate.

our server was very friendly and sweet. between the hostess, the bartender and the server, i thought the service there was excellent. i would love to go back again soon on a night when it’s not so crazy – because i really feel like the food is spectacular.


address: 1503 N. Farwell Ave., Milwaukee, 53202, www.thepastatreemilwaukee.com

atmosphere: it’s one of those places that you can wear jeans and a nice shirt, or also get a little fancy in a dress and heels and feel comfortable either way.

service: fantastic service

sound level: low

recommended: carbonara

prices: $$$

open: 5pm – 10pm, Tuesday through Sunday. closed on Mondays

reservations: accepted

wheelchair access: yes

*price ratings and review reflect only the reviewer’s reaction to their experience of the food, ambience, service and price of establishment being reviewed.

email: vbruce@yahoo.com. follow eating in MKE on twitter: @eatinginmke


the HeyLets app focuses on positive reviews of local experiences: food, entertainment, etc. download it here and check out my reviews!: http://hey.li/1E07nJX

bbq chicken, bacon and caramelized onion pizza

what a better way to bond with your guy this Valentine’s Day weekend than to get your hands dirty in the kitchen together. this recipe revolves around bacon, bbq sauce and pizza…you can’t go wrong. my boyfriend enjoys bbq chicken pizzas, and i thought i’d give it a whirl, but i really wanted to take the ingredients up a notch. i made the components earlier in the day, and we got together and assembled the pizza together that evening.

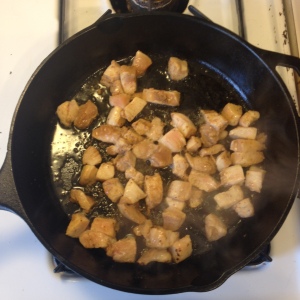
first step was cook the bacon. i made sure to do this first since i wanted to use the bacon fat to cook the remaining ingredients in. i’ve found that the easiest way to cook up some bacon that you’re going to crumble anyway, is to take bacon right out of the fridge, pull out as many pieces as you need, leave them stuck together, and slice them with a sharp knife. once they get room temperature they start to get stretchy and a little more difficult to cut. the bonus side to this method is that you don’t need to mess around with crumbling the bacon by hand and getting your hands all greasy after cooking.

IMG_0378

i sprinkled my bacon with a healthy dose of pepper to take it up a notch. peppered bacon is super expensive, so this route is a little less glamorous, but definitely more cost effective. once your bacon is cooked, remove it from the pan and drain using a paper towel lined plate. try to avoid eating all of it because it will be set aside for quite some time. also, your man will probably try to steal some too…so either make more than is called for, or put it away. far, far away. at this point, i put the majority of the bacon grease in a glass dish and set it aside for caramelizing some of the onions in. i didn’t want my chicken swimming in bacon grease.

IMG_0380

while the pan is still hot, cook up your diced chicken. the grocery store i go to has marinated chicken in their meat department, so i grabbed some chicken that had already been marinating in bbq sauce. it’s not necessary, but i thought it might further drive home the bbq theme. once the chicken is cooked, set aside in another dish. i added about a tablespoon of prepared bbq sauce to the chicken so it would continue its marinating until we were ready to assemble the pizza.

IMG_0379

next step is to slice up the red onion thinly, and i mean thinly. about 1/8″ thick. p.s. check out my super artsy photograph above featuring my new favorite knife. to the onion, add about a tablespoon of the bacon grease, and another of olive oil. season with salt and pepper, and drizzle with just a little bit of honey which helps with the caramelization process.

IMG_0381

this photo was taken about half way through cooking. i should note that this is the one and only time that i properly and successfully ended up with caramelized onions. i found this awesome article by Bon Appetit about caramelizing onions. it made me realize i had been doing just about everything wrong in the past. this process takes a long time, like 40-45 minutes, so be prepared to spend some time on it, and be patient. once the onions are done caramelizing, de-glaze the pan with a splash of balsamic vinegar, and be sure to scrap up the little flavor bits on the bottom of the pan. you can really use whatever you want to de-glaze the pan…my initial thought was to use some beer, but i liked the idea of the sweetness of the balsamic a little better. plus it was early in the day.

i am not a baker, and i do not mess around with dough. i have very little patience for measuring and mixing and kneading and whatever other tedious things come with baking. buy store bought pizza dough and save yourself the frustration. we used the store brand pizza dough you get in the refrigerated section that rolls out, and it was just fine. we both really prefer the thinnest possible crust, and this was not bad, but i think i’m going to look into other options for thin crust next time we make pizza together. or maybe try to roll it out thinner, and since i don’t have a rolling pin, it might end up a little shotty, but i’m willing to try.

now the fun part. the assembly.

spread a small amount of bbq sauce on your outstretched dough. i am notorious for too much sauce, salad dressing, etc…more of a delicious thing isn’t always better. a light spread will do. we placed the caramelized onions down next, spreading them out so there weren’t large globs of them. next the chicken and the bacon. i am a jalapeno lover, and you can see on the upper half that we added some pickled nacho-style jalapenos on my half 🙂 then covered in shredded colby-jack cheese.

IMG_0382

the pizza turned out great, although we both agreed that the bacon got a little lost. more might be the answer…yep, more bacon is always the answer.


bbq chicken, bacon and caramelized onion pizza

4 (or more) slices of bacon, diced

salt and pepper to taste

1 chicken breast, diced in 1/2″ to 3/4″ cubes. (think small bite size…or the size you’d give a toddler?)

1/2 cup + 1T bbq sauce, divided

1/2 small red onion, about 1/8″ thick

1T bacon grease

1T olive oil

Drizzle of honey

Splash of balsamic vinegar, or beer, or wine, or even water for deglazing

1 store bought pizza crust

1-1/2 cup shredded colby-jack cheese (we used the 2% cheese…you know, to make this healthy)

6-8 slices of nacho-style jalapenos (optional)

Directions:

1. pre-heat oven according to the directions on your pizza dough.

2. heat a cast iron (or your favorite non-stick pan) over medium heat.

3. add diced bacon and add pepper to taste. cook thoroughly and drain on a paper towel lined plate. reserve about 1/2 of the bacon grease for later use.

4. add diced chicken to same pan and cook through, about 10 minutes. remove from pan and add 1T of bbq sauce to cooked chicken, stirring to coat. set aside.

5. in heated pan, add about 1T reserved bacon grease, and 1T of olive oil. add thinly sliced red onion and turn heat down to low. If you’re using a gas stove, the flame should barely be on. if you’re using an electric oven, turn it down to the lowest temperature you can. season with a little salt and pepper, then drizzle with a little honey to give the caramelization process a little head start. you will need a solid 40 minutes or so for these, stirring frequently. don’t forget to read this article on caramelized onions before starting this.

6. once it looks like the onions are about done (probably at the 35 minutes mark or so) add a splash of whatever deglazing liquid you choose. start small. you don’t want to drown your onions or make it soup. you just need the pan to sizzle a little, then use your wooden spoon or utensil of choice and scrap the bottom of the pan. set aside once done. cook for another 5 minutes or so.

7. roll out (or unwrap) your chosen pizza dough. top with 1/2 cup of your favorite bbq sauce. use your judgment here…if you prefer more sauce, or think that might be too much for the size of your dough, adjust the recipe as needed.

8. spread out your caramelized onions, chicken, jalapenos (optional) and the 1-1/2 cup cheese.

9. bake according to the directions on your dough.


the HeyLets app focuses on positive reviews of local experiences: food, entertainment, etc. download it here and check out my reviews!: http://hey.li/1E07nJX

serrated steak knife confessions

i have a confession to make. up until recently, i used a serrated steak knife for all things culinary; chopping, cutting, butterflying, julienne-ing, etc. you name it. if i was cutting it in the kitchen, it was with a serrated steak knife. they were small enough for me to handle comfortably and stayed [sort of] sharp. cutting a large piece of meat or a melon proved to be a little sketchy, but i still have all ten fingers, so i was doing a-ok. large knives always seemed unwieldy and overzealous, or somehow pretentious. as if using a large butcher knife would make me a snarky, asshole hipster or something. additionally, i’m pretty sure that any oversized knife i had was remorsefully and embarrassingly dull which made it even more dangerous, but truth be told, i doubt i knew the difference.

anyone who knows me knows that i’m a control freak, and i think that’s part of my discomfort with large sharp things. i never felt like i had control over a large knife. i am a painter by nature, and having control or something smaller, more gentle and far less sharp like a paintbrush is a little more in my comfort zone. large butcher knives can be nearly as long as my forearm and my overactive imagination envisions slicing off my whole hand in similar fashion to a bad zombie movie.

i’ve known for quite some time that if i was ever going to make cooking a real, honest hobby that i needed to graduate from the serrated steak knife, but i wasn’t having anything to do with the ridiculous cleavers i’ve seen on television or in stores. early last year when my boyfriend and i moved in together, he came with not only a great set of glass storage containers and two cats, but also this perfectly sized knife that seemed like it was made for me.

it’s probably no more than 5 or 6 inches, which is a perfect size and less intimidating, plus it was actually sharp. and i mean sharp. my hours logged in watching Food Network have taught me how to hold it correctly, so i believe i’m on the right path. as cheesy and lame as it sounds, i think it might have actually produced some additional confidence in the kitchen. maybe one of these days i’ll get some fancy knives or take some knife handling classes, but for now, i’m proud of my graduation from serrated steak knife to a real, legit knife that actually requires sharpening every now and again.

review: NaNa Asian Fusion and Sushi Bar

last saturday was date night, complete with dinner, drinks and maybe an extra drink or two we didn’t need. (read: i was solidly hungover on sunday. and there might’ve been a tequila shot or two thrown in for good measure.) luckily, everything was in walking distance so, you know, no drinking and driving.

we walked around the corner to NaNa Asian Fusion and Sushi Bar. we’ve gotten take out from there a few times, and eaten there maybe one other time. every time we stop in there, either for pick up or dine in, it always seems pretty dead. even on a Saturday, there were probably only 6 or 7 tables seated at about 7pm or so.

nana_inside

when we sat down, a nice (but maybe a little stoned?) young server came by the table to take our order. an overarching comment about the service at NaNa: the server was always around if we needed him, however, it would do the server, and NaNa, a world of good to spend some time training their servers. i wouldn’t say that the service was bad, but when your server fills your chardonnay glass right up to the top, or looks sort of confused when you order, that might be a sign that he needs a little training. i appreciate that he recited our order back to us for confirmation, but i wasn’t speaking quickly, so he probably should’ve gotten it.

speaking of the food – we ordered duck potstickers, seaweed salad, alaskan roll, spicy red snapper roll, shrimp tempura roll and one of their house special rolls called the Texas grill roll.

potstickers seem to be different every where. i was expecting these to be a little more like fried dumplings, but they reminded me more of phyllo pastries, like an Asian version of Greek spanakopita. NaNa’s take on potstickers were still delicious, although I’m not sure I would order them again. their gyoza is much better if you’re looking for something in the dumpling arena.

it should also be noted that our server did not bring plates for us when the potstickers came. training would’ve taught him this.

i love seaweed salads, and am fully convinced that the vitamins and minerals in a seaweed salad will snap you back from any cold, flu or hangover. NaNa’s seaweed salad was unlike many others that i’ve had, in both good and not so good ways. i like a straight up seaweed salad – seaweed and the traditional Asian vinaigrette, no muss, no fuss. NaNa’s was on a bed of spinach (?), with a few strategically placed sliced cherry tomatoes (?), and a mystery item which was somewhere between the harder core part of a pineapple and maybe those bamboo shoots you get in Chinese food sometimes? i’m still not sure what those were. the fantastic part of the seaweed salad was the vinaigrette that was on it. it was bright and flavorful. the vinaigrette made up for the other weirdness on the plate. [we did have plates now, btw.]

the Alaskan roll, again, while delicious contained an awful lot of lettuce, which, now while thinking of it – i think we received a Boston roll and not Alaskan since they don’t actually have lettuce in them. we wanted to try something different so we went with the spicy red snapper instead of the spicy tuna which is what we normally get. it was delicious, but if i had the red snapper and a spicy tuna roll in front of me, i’m not sure if i could tell the difference.

shrimp tempura rolls have quickly become one of our favorites and NaNa has a great one. especially when they are fresh from the kitchen and still a little warm and really crunchy. the star of the show was really the special Texas grill roll. i have this thing for warm sushi rolls…not warm like they’ve been sitting out, but warm like they were recently wrapped in foil and engulfed in flame. to be honest, i can’t remember what was in it, but it was warm deliciousness, wrapped in a blanket of thick, spicy sauce, hugged with a layer of foil and thrown on a grill.

i’m sure sushi master chefs would be rolling over at the thought of sushi drenched in sauce and grilled, but i’m sure they’d get over it if they ate it.

we finished our date night with a few brandy old fashioneds down at Camp Bar. lovely evening, with lovely company.


address: 4511 N. Oakland Ave, Shorewood, WI

atmosphere: casual

service: all in all, it’s fine, but i think some extra training for the servers would do wonders for the dine in business.

sound level: low

recommended: gyoza, Texas grill roll

prices: $$$

open: Mon.-Thurs.: 11:00am-10:00pm, Fri.: 11:00am-11:00pm, Sat.: 11:30am-11:00pm, Sun.: 12:00am-10:00pm

reservations: yes

wheelchair access: yes

price ratings and review reflect only the reviewer’s reaction to their experience of the food, ambience, service and price of establishment being reviewed.

email: vbruce@yahoo.com. follow eating in MKE on twitter: @eatinginMKE


photo credit: http://nanashorewood.com/

teriyaki pork chops with grilled pineapple – good housekeeping cookbook, recipe 2

it’s January in Wisconsin, i neither have a grill nor a patio to speak of, however, i had a request to make bone-in pork chops, so here we are. the Good Housekeeping Cookbook has very few pork chop recipes and leans more heavily on pork tenderloin, so i had to delve into the grilling section of the cookbook and rely on my cast iron grill pan to make this dinner happen.

i was really excited to have a reason to buy ginger. there’s nothing like fresh ginger. its bright, refreshing scent is enough for me, but the health benefits of ginger are an added bonus. a tip for storing ginger: you can easily freeze it, and use a spoon to scrap away the peel and grate it frozen.

the recipe begins by creating a marinade for the pork chop, made from green onions, soy, brown sugar and freshly grated ginger. the marinade was fantastic, although i probably would’ve increased the brown sugar a little. i used light soy, and i felt as though the soy flavors were coming through much more strongly than any of the other flavors. teriyaki is classically pretty sweet and i didn’t really get the sweetness that i was anticipating.

while the pork chops were marinating, i grilled the pineapple, sprinkled with a little brown sugar. i only have so much room on my grill pan so i had to cook this recipe in batches. i turned the oven on 200 degrees to keep the pineapple warm after grilling. the pork chops hit the “grill” next. as with the previous recipe, the cooking times in this recipe were spot on. 5 minutes on each side for these 3/4″ bone-in pork chops and they were cooked perfectly. the grilled pineapple was warm and sweet; an ideal side for these Asian-inspired pork chops. i also made some unfortunate rice-a-roni fried rice that was sort of a disaster, but we won’t talk about that.

next time, i might consider making another batch of marinade and cooking it down to reduce and thicken it, and use it as a sauce to serve with the pork chops. they were, by no means, dry, but i suppose i was looking for a more sweet and thick teriyaki sauce. also, my cast iron grill pan was a nightmare after cooking these, so i would suggest keeping these contained to an actual grill.


Teriyaki Pork Chops with Grilled Pineapple from the Good Housekeeping Cookbook

Ingredients

  • 2 green onions, chopped
  • 1/3 cup(s) soy sauce
  • 2 tablespoon(s) gingerroot, grated and peeled
  • 2 tablespoon(s) (plus 1/4 cup) packed light brown sugar
  • 4 (about 8 ounces each) pork loin chops, each 3/4 inch thick
  • 1 small pineapple
  • Green-onion strips, for garnish

Directions

  1. In 13-inch by 9-inch glass baking dish, prepare teriyaki sauce: With fork, mix green onions, soy sauce, ginger, and 2 tablespoons brown sugar. Add pork chops, turning to coat with teriyaki mixture. Let stand 20 minutes to marinate.
  2. Meanwhile, cut off rind from pineapple, then cut pineapple crosswise into 1/2-inch-thick slices. Rub pineapple slices with 1/4 cup brown sugar.
  3. Place pineapple slices on grill over medium heat. Cook pineapple slices 15 to 20 minutes until browned on both sides, turning slices occasionally.
  4. After pineapple has cooked 10 minutes, add pork chops and cook until lightly browned on both sides and chops just lose their pink color throughout, about 10 minutes. Turn chops occasionally and brush with remaining teriyaki mixture halfway through cooking time.
  5. Serve pork chops with grilled pineapple slices. Garnish with green-onion strips.

thyme-roasted chicken and vegetables – good housekeeping cookbook recipe #1

as mentioned in my previous post, i went on a little excursion for a new cookbook this past weekend with the intentions of making my way through it and sharing my experiences, a la Julie & Julia. i needed to find a recipe with bone-in chicken so that i could start my collection of bones and kitchen scraps to make bone broth with, so i settled easily on Thyme-Roasted Chicken and Vegetables.

i am always attracted to recipes that require a single pan/pot/skillet, etc. there’s something about tossing a bunch of random things together and coming out with something harmonious that speaks to me for whatever reason. i also have never made a whole (albeit cut-up) chicken before, so this was a new experience for me. i’m usually a little skittish about meats that are still in their whole form since it really accentuates the fact that it was once a living, breathing animal, but – i digress. the grocery store had a fantastic sale on whole chickens which made me even more happy to make this recipe. the whole thing cost me less than $10, with only fresh thyme and the basics (salt, pepper, olive oil) already on hand.

the recipe begins with placing the chicken pieces in your pan. turns out mine cooking dish was a little smaller than what was suggested, but i went with it anyway. i ended up using less vegetables to accommodate. the next step is to place large wedges of potatoes (i used red), onion and fennel around the chicken. then drizzle with olive oil and sprinkle with thyme, salt and pepper…that’s it. i also added some of the fennel fronds to the dish so they didn’t go to waste.

in addition to recipes that are all cooked and contained in one vessel, this recipe dirtied all of three things: a cutting board, knife and a bowl that i used to collect my previously mentioned kitchen scraps. the recipe calls for basting, and since i don’t have a baster, i used a pastry brush – so i suppose i dirtied that as well. easy recipe, easy cooking, easy cleanup. there’s a note about taking out the breasts sooner and cooking the rest for an additional 10 minutes – that seemed weird since the breasts were larger and thicker, but i’m glad i followed the directions. they were definitely done after that point, and there would be a little carryover cooking so it was perfect. the cooking times were spot on which is imperative for a good quality cookbook.

the finished product was really delicious – i’m generally underwhelmed by chicken (unless it’s fried and covered in buffalo sauce), but i was happy with the way this turned out. i’m not a fan of actually eating chunks of fennel but i thought the flavor it added was definitely necessary. it would’ve been pretty flat without it. the potatoes that were along the side of the pan got a little browned and crispy, and roasted onions are probably one of my favorite roasted vegetables. we had plenty for the two of us, with a half chicken leftover that we’ll making tacos with tonight. the plus side to the flavors in this chicken dish is that they aren’t overpowering, so any leftover chicken can be used in just about any way you’d like. the recipe notes that it makes 4 servings, which is also perfectly accurate.

all in all, i think my first Good Housekeeping Cookbook recipe was a success, and i’m looking forward to making something new this weekend! stay tuned to the blog to see which recipe i make next.


Thyme-Roasted Chicken and Vegetables, by Good Housekeeping 

Ingredients

  • 1 (3 1/2 pounds) chicken, cut into 8 pieces and skin removed from all but wings
  • 1 pound(s) (3 medium) all-purpose potatoes, not peeled and cut into 2-inch pieces
  • 1 large (1 1/2 pounds) fennel bulb, trimmed and cut into 8 wedges
  • 1 large red onion, cut into 8 wedges
  • 1 tablespoon(s) chopped fresh thyme
  • 1 teaspoon(s) salt
  • 1/2 teaspoon(s) ground black pepper
  • 2 tablespoon(s) olive oil
  • 1/3 cup(s) water

Directions

  1. Preheat oven to 450 degrees F. In large roasting pan (17″ by 11 1/2″), arrange chicken, and place potatoes, fennel, and onion around it. Sprinkle chicken with thyme, salt, and pepper. Drizzle oil over chicken and vegetables.
  2. Roast chicken and vegetables 20 minutes; baste with drippings in pan. Roast, basting once more, until juices run clear when chicken breasts are pierced with tip of knife, about 20 minutes longer. Transfer chicken breasts to platter; keep warm.
  3. Continue roasting remaining chicken pieces until juices run clear when thickest part of chicken is pierced with tip of knife and vegetables are fork-tender, about 10 minutes longer. Transfer chicken and vegetables to platter with breasts; keep warm.
  4. Skim and discard fat from drippings in pan. To drippings, add water; heat to boiling over medium heat, stirring until brown bits are loosened from bottom. Spoon pan juices over chicken and vegetables. Makes 4 main-dish servings.

that new cookbook smell

it has become evident lately that i’m lacking in one huge area: the cookbook. there’s no The Joy of Cooking, no Mastering the Art of French Cooking hanging out on my kitchen shelves. sure, i have a few cookbooks – a lovely Bon Appetit one, Stella McCartney’s Meat Free Monday, when i was into that sort of thing a little more…but none of the classics; none of the books that are prerequisites to being a stellar home cook.

so i decided to head out to Barnes and Noble this weekend and pick up a new cookbook. i had gone with the intentions of picking up The Joy of Cooking but after a). searching high and low to eventually find it under a display table [clearly a sign that book wasn’t for me], and b). flipping through and finding it rather reference-y, i waffled between Saveur’s New Classics and Good Housekeeping’s cookbook, finally to land on The Goodhousekeeping Cookbook: Sunday Dinner Collector’s Edition.

my initial impression and what sold me was gorgeous photographs, number of recipes in the book (over 1,275) and the general theme of Sunday Dinner. the idea of Sunday (or whatever day of the week) Dinners is something that i feel very strongly about. while my household consists of my boyfriend and two cats, we still manage to sit down at the table once, if not twice a week…we catch up on our day and make google-y eyes across the table.

what makes this a Sunday Dinner edition is menu suggestions sorted by season, and there are other suggestions to involve your family members in the prep, cooking and shopping. the menu suggestions include a main entree, two sides (or one side and first course) and a dessert. while this might not work for my immediate needs, the idea of having menus ready to go would be helpful for holidays or family functions where we might have a handful of guests.

the book is definitely written for the new home cook – with great reference sections on cooking terms, descriptions of vegetables and when they are in season, and cooking techniques. much of this information i’m familiar with, but it’s still nice to have it on hand if need be. the vegetable section has tips on freezing and storing, and i particularly love the canning section since i’ve been flirting with the idea of canning things.

the recipes themselves include great standbys like apple pie and roasted Thanksgiving turkey, but the rest of the recipes are a little more unique and/or ethnic, with completely accessible and easily found ingredients. one of the notes in the beginning of the book mentioned that the recipes were created by chefs, but registered dietitians were also consulted. i am the type of cook that uses real butter, and doesn’t shy away from cream cheese, but everything should be used in moderation and it looks like this cookbook gets that. a tablespoon of butter won’t kill you, but a dinner that tastes like cardboard just might.

i wanted to make a roasted chicken dish immediately since i’m also on this bone broth kick and i’m dying to make some but obviously need chicken bones. (if you’re not familiar with this bone broth fad, check out this article and this article.) keep your eyes peeled for a review of my first Good Housekeeping recipe, and my weekly “Julie & Julia-esque” posts as I make my way through this cookbook.

balance: the key to making something out of nothing

the biggest cooking-related lesson i’ve learned has been balance. bitter, sour, salt, umami and sweet. and let’s be real, i don’t deny that umami exists, but my belief is that umami is created once your dish is in balance. i don’t know what it means to add umami to my dish.

i can follow a recipe and have balance created for me, but nothing is more gratifying than taking a bunch of random things in my fridge and creating something that works…simply because of the understanding of balance. i grew up in a household where wasting things and throwing away food was unheard of, so probably once a week, i toss together miscellaneous things in my refrigerator and call it a casserole (or a skillet, or whatever).

after a (depressing) weekend of football, we came home from my parents’ house with a number of random leftovers, not to mention, our fridge was already overflowing with a cornucopia of odds and ends. here’s what i combined to create a casserole (this is not in recipe form, but just go with me for a sec…)

chicken sausage, leftover pre-cooked noodles, leftover spinach/artichoke dip, garlic, spinach, broccoli, jarred roasted red peppers, capers, red onion, worcestershire, fontina cheese, salt & pepper, and panko breadcrumbs. i combined it all in a mixing bowl, poured it into a dish sprayed with cooking spray, and topped with the panko drizzled with olive oil. i baked it for 25 minutes at 400 degrees. i was so happy with the result! you generally can’t lose when your casserole has a little spinach dip as its base (hello, cream cheese and mayo).

here’s why this mix of random things worked:

  • bitter – broccoli, spinach, red onion
  • sour – capers, artichokes in the dip
  • salt – chicken sausage
  • sweet – worcestershire, the roasted peppers could probably be considered sweet
  • umami (resulting from ingredients above) – however, i’ve read that worcestershire could be considered umami because in and of itself, it covers a range of sweet and salty as well as spicy and sour.

so what are you making tonight with the things you need to use up in your refrigerator? here are a few examples of each flavor and hopefully this will help get a few ideas going:

  • bitter – many greens or lettuces, many green vegetables, coffee, nuts
  • sour – vinegar, or anything vinegar-based, citrus juices, mustard, tomatoes, yogurt, fermented foods
  • salt – salt, soy sauce, hard cheese like parmesan
  • sweet – hoisin sauce, honey or agave, very ripe fruits, sugar
  • umami (imo: resulting from ingredients above) – however, worcestershire, mushrooms, prosciutto, and aged cheeses are considered umami ingredients.

i always attempt to pair something from each of the categories above with a starch of some form – noodles, brown rice, potatoes, etc. to make things more complicated, you may also consider high, medium and low notes within your dish.

low notes: things like seared meats, mushrooms, beans, etc. these are the base flavors that provide the backdrop for other flavors. think earthy.

medium notes: things like raw vegetables and chicken. these are items that are boring without the high and low notes to make them more exciting.

high notes: things like acid, spice and fresh herbs. the high notes round out your dish and brighten your flavors.

happy leftovering.